Free Facebook Likes, Youtube Subscribers,  Twitter Followers

Ads 468x60px

Blogger Tricks

Blogger Themes

Приказивање постова са ознаком Agility. Прикажи све постове

7. 9. 2013.

6-week plyomethrics training and its relationship to agility improvement

Plyometrics, also known as "jump training" or "plyos", are exercises based around having muscles exert maximum force in as short a time as possible, with the goal of increasing both speed and power. This training focuses on learning to move from a muscle extension to a contraction in a rapid or "explosive" way, for example with specialized repeated jumping. Plyometrics are primarily used by athletes, especially martial artists and high jumpers, to improve performance, and are used in the fitness field to a much lesser degree.
Agility is the ability to move and change direction and position of the body quickly and effectively while under control.
I am giving here a fantastic research about how will 6-week plyomethrics training improve your agility performances.

13. 8. 2012.

Illinois agility run test


The objective of the Illinois Agility Run Test is to monitor the development of the athlete’s speed and agility.

Required resources

To undertake this test you will require:
  • Flat surface – 400 metre track
  • 8 cones
  • Stop watch
  • Assistant.

The Illinois course

The length of the course is 10 metres and the width(distance between the start and finish points) is 5 metres. On the track you could use 5 lanes.
4 cones can be used to mark the start, finish and the two turning points. Each cone in the centre is spaced 3.3 metres apart.


How to conduct the test

The Illinois Agility Run Test is conducted as follows:
  • The athlete lies face down on the floor at the start point.
  • On the assistant’s command the athlete jumps to his/her feet and negotiates the course around the cones to the finish.
  • The assistant records the total time taken from their command to the athlete completing the course.

Analysis

Analysis of the result is by comparing it with the results of previous tests. It is expected that, with appropriate training between each test, the analysis would indicate an improvement.

Normative data for the Illinois agility run test

Gender
Excellent
Above Average
Average
Below Average
Poor
Male
< 15.2s
15.2 – 16.1s
16.2 – 18.1s
18.2 – 18.3s
> 18.3s
Female
< 17.0s
17.0 – 17.9s
18.0 – 21.7s
21.8 – 23.0s
> 23.0s

Target group

This test is suitable for team sports but not for individuals where the test would be contraindicated.

Reliability

Reliability would depend upon how strict the test is conducted and the individual’s level of motivation to perform the test.

Validity

There are no published tables to relate to potential performance in competition.

505 Agility Test


The objective of the 505 agility test is to monitor the athlete’s speed and agility with a 180 degree turn.

Required resources

To undertake this test you will require:
  • 6 cones
  • Tape measure
  • Non slip surface
  • Stop watch
  • Assistant.


How to conduct the test

The 505 agility test is conducted as follows:
  • Mark out the course as per the diagram above. The distance from A to B is 10m and the distance from B to C is 5m.
  • The athlete runs from the start line(A) towards the 10m line(B) (run in distance to build up speed).
  • The assistant starts the stop watch as the athlete passes through the 10m line(B).
  • The athlete runs on to the 15m line(C), turns and runs back towards the start line.
  • The assistant stops the stop watch when the athlete passes through the 10m line(B) on their return to the start line.
  • The best of two trails is recorded.

Analysis

Analysis of the result is by comparing it with the results of previous tests. It is expected that, with appropriate training between each test, the analysis would indicate an improvement in the athlete’s agility.

Target group

This test is suitable for active athletes but not for individuals where the test would be contraindicated.

Reliability

Reliability would depend upon how strict the test is conducted and the individual’s level of motivation to perform the test.

Validity

There are no published tables to relate to potential performance in competition.


Zig-Zag Test


The objective of the zig-zag test is to monitor the athlete’s speed and agility.

Required resources

To undertake this test you will require:
  • 5 cones
  • Non slip surface
  • Stop watch
  • Assistant.

How to conduct the test

The Zig-Zag Test is conducted as follows:
  • Mark out the course with four cones placed on the corners of a rectangle 10 by 16 feet, with one more cone placed in the centre.
  • The athlete follows the grey route identified on the diagram.
  • The athlete completes one circuit of the course starting and finishing at the Start/Finish cone(see picture below).
  • The assistance records the time for the athlete to complete the course.


Analysis

Analysis of the result is by comparing it with the results of previous tests. It is expected that, with appropriate training between each test, the analysis would indicate an improvement in the athlete’s agility.

Target group

This test is suitable for active athletes but not for individuals where the test would be contraindicated.

Reliability

Reliability would depend upon how strict the test is conducted and the individual’s level of motivation to perform the test.

Validity

There are no published tables to relate to potential performance in competition.

10. 8. 2012.

Hexagonal obstacle test

 
The objective of the hexagonal obstacle test is to monitor the athlete’s agility.

Required resources

To undertake this test you will require:
  • 66cm sided hexagon marked out on the floor
  • Stop watch
  • Assistant.

How to conduct the test


The hexagonal obstacle test is conducted as follows:
  • The athlete stands in the middle of hexagon, facing line A.
  • At all times throughout the test the athlete is to face line A.
  • On the command GO the watch is started and the athlete jumps with both feet over line B and back to the middle, then over line C and back to the middle, then line D and so on.
  • When the athlete jumps over line A and back to the middle this counts as one circuit.
  • The athlete is to complete three circuits.
  • On completion of three circuits the watch is stopped and the time recorded.
  • The athlete rests and then repeats the test.
  • On completion of the second test determine the average of the two recorded times.
  • If you jump the wrong line or land on a line then the test is to be restarted.

Analysis

Analysis of the result is by comparing it with the results of previous tests. It is expected that, with appropriate training between each test, the analysis would indicate an improvement in the athlete’s agility.

Performance assessment

For an evaluation of the athlete’s performance determine the average time from the two tests and then see the normative table below for an assessment.

Normative data for the hexagonal obstacle test

Gender
Excellent
Above Average
Average
Below
Average
Poor
Male
<11.2 s
11.2 – 13.3s
13.4 – 15.5s
15.6 – 17.8s
>17.8s
Female
<12.2 s
12.2 – 15.3s
15.4 – 18.5s
18.6 – 21.8s
>21.8s

Target group

This test is suitable for active athletes but not for individuals where the test would be contraindicated.

Reliability

Reliability would depend upon how strict the test is conducted and the individual’s level of motivation to perform the test.

Validity

There are no published tables to relate results to potential performance in competition.

9. 8. 2012.

T-drill test


The objective of this test is to monitor the development of the athlete’s speed with directional change.

Required resources

To undertake this test you will require:
  • Flat surface
  • 4 cones
  • Stop watch
  • Assistant.

How to conduct the test

  • 3 cones are set five metres apart on a straight line.
  • A fourth cone is placed 10 metres from the middle cone so that the cones form a letter T.
  • The athlete starts at the cone at the base of the T.
  • The coach gives the signal to “Go” and starts the stop watch.
  • The athlete runs to the middle cone, touches the cone.
  • The athlete then side steps 5 metres to the left cone, touches that cone.
  • The athlete then side steps 10 metres to the far cone and touches that one.
  • The athlete then side steps 5 metres back to the middle cone, touching that one.
  • The athlete then runs 10 metres backwards to the base of the T and touches that cone.
  • The coach stops the watch and records the time.

Analysis

Analysis of the result is by comparing it with the results of previous tests. It is expected that, with appropriate training between each test, the analysis would indicate and improvement in the athlete’s speed.

Target group

This test is suitable for active athletes but not for individuals where the test would be contraindicated.

Reliability

Reliability would depend upon how strict the test is conducted and the individual’s level of motivation to perform the test.

Validity

There are no published tables to relate results to potential performance in competition.

Burpee test


The objective of this test is to assess the athlete’s agility and balance.

Required resources

To undertake this test you will require:
  • Dry surface
  • Assistant.

How to conduct the test

The test is conducted as follows:
  • The athlete practices the technique which involves:
-          standing erect, arms by the side
-          placing the hands on the floor in front of the feet(squat position)
-          thrusting the legs back to assume a push up position with a straight line from the shoulders to the heels
-          returning to the squat position
-          returning to the starting position.
·         The athlete performs as many repetitions as possible in 15 seconds
·         A point is given for every successfully completed repetition
·         Half a point is deducted for each repetition in which poor technique is demonstrated, such as:
-          not resuming the erect position
-          kicking the feet back prior to hand placement
-          not assuming a straight push up body position.

Analysis

Analysis of the result is by comparing it with the results of previous tests. It is expected that, with appropriate training between each test, the analysis would indicate an improvement.

Target group

This test is suitable for active athletes but not for individuals where the test would be contraindicated.

Reliability

Reliability would depend upon how strict the test is conducted and the individual’s level of motivation to perform the test.

Validity

There are no published tables to relate results to potential performance in competition.

Quick feet test


The quick feet test provides information on the presence of fast-twitch muscle fibre in the muscles involved in sprinting and indicates your potential to execute quick movements. Hereditary factors such as limb length, muscle attachments, and proportion of fast-twitch fibres do place a limit on one’s maximum potential, but we can improve our speed and quickness with proper training.

Required resources

To undertake this test you will require:
  • Flat surface
  • 20 two-foot long sticks or a 20-rung rope ladder
  • Stop watch
  • Assistant.

How to conduct the test

  • Place 20 two-foot long sticks 18 inches apart or a 20-rung stride rope ladder on grass or athletics track.
  • Athletes should pump their arms vigorously in a sprint-arm motion and use very little knee lift while running down the ladder without touching the sticks/rungs.
  • The coach starts the stopwatch when the athlete’s foot first touches the ground between the first and second stick/rung and stops the watch when contact is first made with the ground beyond the last stick/rung.
  • Record the better of two trials.

Analysis

Analysis of the result is by comparing it with the results of previous tests. It is expected that, with appropriate training between each test, the analysis would indicate an improvement in the athletes foot speed.
Speed through a ladder can indicate much about an athlete’s quickness. A time of less than 2.8 seconds for males and 3.4 seconds for females for running the length of a 20 lung ladder, one foot in each rung at a time, is considered as excellent for college athletes.

Nominative data for the hexagonal obstacle test

Males
Females
Males
Females
Jnr High School
< 3.8 seconds
Jnr High School
< 4.2 seconds
Snr High School
< 3.3 seconds
Snr High School
< 3.8 seconds
College
< 2.8 seconds
College
< 3.4 seconds

Target group

This test is suitable for active athletes but not for individuals where the test would be contraindicated.

Reliability

Reliability would depend upon how strict the test is conducted and the individual’s level of motivation to perform the test.

Validity

There are published tables to relate results to a potential level of fitness and the correlation is high.


Lateral change of direction test


The objective of this test is to monitor the development of the athlete’s speed with directional change.

Required resources

To undertake this test you will require:
  • Flat surface – track
  • 3 cones
  • Stop watch
  • Assistant.

How to conduct the test

  • The 3 cones are set 5 metres apart on a straight line.
  • The athlete starts at the middle cone.
  • The assistant gives the signal to start and points in a specific direction, right or left.
  • The athlete moves to and touches the first cone, returns past the middle cone(start) to the far cone and touches that one and then returns to the middle cone, touching that one.
  • The assistant starts the stop watch on giving the “Go” command and stops the watch when the athlete touches the middle cone.
  • The better of two trails in each starting direction, right and left, are recorded and the best score in each direction is used for scoring.

Analysis

Analysis of the result is by comparing it with the results of previous tests. It is expected that, with appropriate training between each test, the analysis would indicate an improvement.

Normative data for the lateral change of direction test

The following data has been obtained from the results of tests conducted with world class athletes.

% Rank
Females
Males
% Rank
Females
Males
91-100
3.22 – 3.37s
2.90 - 3.05s
41-50
4.02 – 4.17s
3.70 – 3.85s
81-90
3.38 – 3.53s
3.06 – 3.21s
31-40
4.18 – 4.33s
3.86 – 4.01s
71-80
3.54 - 3.69s
3.22 – 3.37s
21-30
4.34 – 4.49s
4.02 – 4.17s
61-70
3.70 – 3.85s
3.38 – 3.53s
11-20
4.50 – 4.65s
4.18 – 4.33s
51-60
3.86 – 4.01s
3.54 – 3.69s
1-10
4.66 – 4.81s
4.34 – 4.49s

Target group
This test is suitable for active athletes but not for individuals where the test could be contraindicated.

Reliability

Reliability would depend upon how strict the test is conducted and the individual’s level of motivation to perform the test.

Validity

There are published tables to relate results to a potential level of fitness and the correlation is high.

26. 4. 2012.

In-Out run


Agility is the ability to move and change direction and position of the body quickly and effectively while under control.
All the exercises in agility training are done at MAXIMUM RATE OF SPEED.
Blue lines symbolize direction backwards, and orange lines symbolize direction forwards. The goal of the exercise is to run to the cone and backwards in the maximal intensity. Distance between central cone and other cones is 5-7m. Test is over once last cone is touched and athlete is returned to the starting cone.

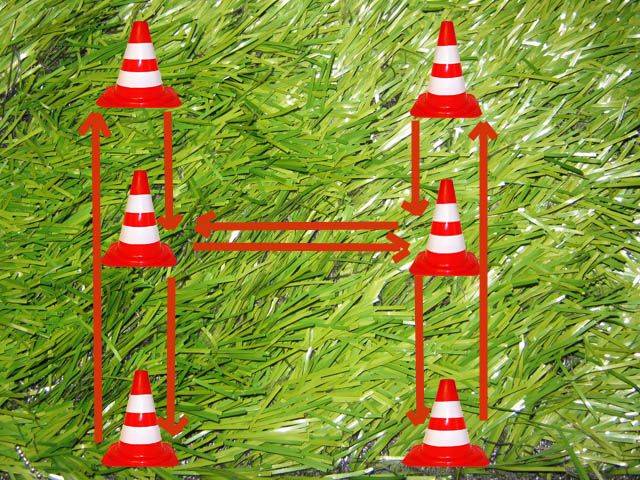
H-run


Agility is the ability to move and change direction and position of the body quickly and effectively while under control.
All the exercises in agility training are done at MAXIMUM RATE OF SPEED.

25. 4. 2012.

W-run


Agility is the ability to move and change direction and position of the body quickly and effectively while under control.
All the exercises in agility training are done at MAXIMUM RATE OF SPEED.

Agility lateral run

Agility is the ability to move and change direction and position of the body quickly and effectively while under control.
All the exercises in agility training are done at MAXIMUM RATE OF SPEED.

15. 3. 2012.

Square run drill


Agility is the ability to move and change direction and position of the body quickly and effectively while under control.
From my personal experience, the best distance for agility is the one where fast movement sections do not cross 6-8m, cause it can create the most influence on a targeted feature.
Here will be presented geomethric drills and letter drills.
All the exercises in agility training are done at MAXIMUM RATE OF SPEED.  


Make sure that you make a square, and edges of your square should be 8-10m long. Place one more cone in the center of your square. Follow the drawn moving directions.  
For running on square edges, use normal running. Once going to the cone in the center, use also normal running, than lateral moving till you reach the center again. Then run forward again and finish.
Your start place is right cone. Finishing line is left cone. 

M-run drill


Agility is the ability to move and change direction and position of the body quickly and effectively while under control.
From my personal experience, the best distance for agility is the one where fast movement sections do not cross 6-8m, cause it can create the most influence on a targeted feature.
Here will be presented geomethric drills and letter drills.
All the exercises in agility training are done at MAXIMUM RATE OF SPEED.  


Looked from birds view, the direction of this exercise reminds on letter "M". Make sure that distance between top cones of the letter is 10 meters, and place the middle cone on 3/5 of that length, on 6m, STARTING FROM THE MIDDLE OF IMAGINED LINE THAT CONNECTS TWO DOWN CONES. 
When running up, go normal running; when running to the central cone, use lateral run; and when running to the last cone, do running backwards.  

Search this blog